Friday, 30 December 2011

That's it for another year....

Plenty going on over the Xmas period but sadly not a lot of time to post about it, so look out for some updates in the New Year. Most excitingly, we've got a working version of an electronic Blood Bowl board game (well, one that you can download player data onto and it recognises which player you're moving, and can even perform some basic game mechanics).

We've also had quite a bit of interest in the microband miniature instruments so we're hoping to ramp up development on those in the new year too.

But all in all, over Xmas, we've eaten too much, made too little and blogged even less.
It's off to the other side of the country tomorrow for a New Year party so don't expect much for the next few days. In the meantime, have a great weekend, and a Happy New Year!


Friday, 23 December 2011

Blood Bowl Digital

It's almost Xmas and time to down tools for a while and get all Christmas-y (despite what some people will tell you, tinsels and baubles still lead soldering irons and wire strippers in the Xmas stakes).
But before we wind down for the holiday season, we've been busy working on a website for our Digital Blood Bowl game board. We've called it Blood Bowl Digital.

A preview of the site can be found at http://www.nerdclub.co.uk/bloodbowl
You can create teams and build online rosters and assign attributes and skills to all your players.
The idea behind this is to have a gateway between an online team/games manager and a way of getting player data into the game board.

Hopefully - if we manage to keep on the "nice list" for the next few days - we'll have some spanky 20x4 character displays to actually demonstrate something come Boxing Day.....


Wednesday, 21 December 2011

Christmas clocks

It's beginning to look a lot like Christmas...... everywhere you go. Ok, it's not. I don't know what it is this year - the doom and gloom peddled on all the news channels, the recession, austerity measures or what - but it just doesn't feel Christmassy.

Maybe it's just because the weather is still quite mild and all the spring bulbs are popping up.
But there's something particularly un-Christmassy this year. There are a few lights about and a few shops have made a half-hearted nod towards Xmas, but in the main - and talking to other people, I'm not the only one - we're still waiting to be hit full in the face with Christmas Cheer.

Which is probably why I've left it so late to get making Xmas gifts this year. Normally, come December 1st, the first little door on the advent calendar gets opened and it's straight into maker-mode, planning and making for everyone. But for some reason, this year things have been left a little late.

Back in November, I was helping Jason with his toy cars and lights controller. But since then, not much on the Xmas front. So last night I fired up the laser cutter and got designing some novelty clocks.
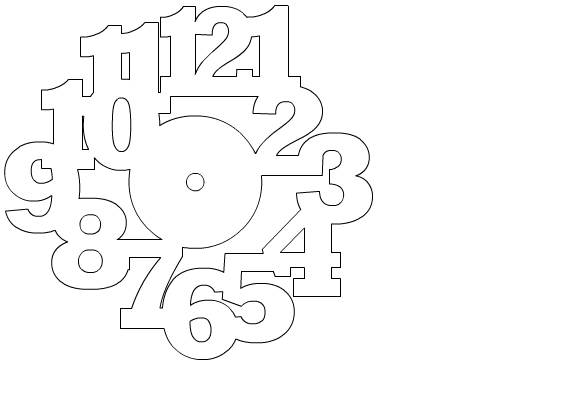
Most of the time was spent on the designing and drawing rather than the actual manufacture (which meant sending to the cutter, waiting a while, then some basic assembly afterwards) but the end results are quite pleasing:

[photo here]

Here are the design files should anyone fancy having a go -
Send the dxf to your laser cutter and carve out from your favourite coloured sheet of A4 acrylic (loaded in landscape).


Links to files:


To finish the clock off (and mostly, to hide the clock movement from behind) I cut out some shapes from a second colour and fitted them inside some of the cut-outs from the main clock face. By turning the clock over they could simply be held in place with some tape. I used double-sided tape, then stuck a piece of card over the whole arrangement, to keep the shapes from falling out once the clock was on the wall.

[photo of reverse]


Here's a slightly different clock, requiring a little more assembly.
At first I wasn't too sure about the design but the more I look at it, the more it grows on me. At first I thought about making the smaller coloured numbers as inserts (so they mounted flush with the surrounding shapes) but now I think I prefer them as relief shapes, sitting on top of the basic number shape.

[photo of second clock]

I think it's the clear acrylic ring that makes this clock work so well. It means positioning the numbers is relatively easy (it would have been a nightmare trying to stick just the very edges of a few numbers to the centre disc to hold it all together) but when the clock is on the wall, the final effect is quite striking!

Here are the design files if you fancy making one of these yourself:

this is the clear acrylic ring that some of the numbers mount onto

with some clever layout, you can get all the numbers onto a single A4 sheet

optional extra - inset characters for the numbers 2,4, 6, 8, 10 and 12

Links to files:


Lastly, here's a simpler version of the second clock that requires much less assembly, designed smaller to fit on a single A4 sheet of acrylic (or wood or whatever you're making your clocks out of!)

this clock has all the numbers connected to make a single solid piece

using the previous clock as a base, this clock can also have raised numbers placed on top of the base design, or you can cut the inset figures out and use different coloured acrylic (wood, whatever) to fill the gaps

Links to files:
http://www.nerdclub.co.uk/files/clock1_single_piece.dxf
http://www.nerdclub.co.uk/files/clock1_with_insets.dxf
http://www.nerdclub.co.uk/files/clock1_inset_numbers.dxf


Sunday, 18 December 2011

Stripping paint from Blood Bowl miniatures

Yesterday morning the postie delivered a whole team of (second-hand eBay bargain) Orcs to Nerd Towers and - as is normal with most things when something new arrives - we immediately dropped everything and spent some time getting all excited about the newest thing to be working on!

They're the "older" - 2nd or 3rd edition - style Orc team called The Orcland Raiders, not the American Football style team we've mentioned in a previous post, but they were (relatively) cheap with the added bonus of already being painted.


An orc team from Games Workshop. We're not expecting ours to be painted to anywhere near this standard!

 None of us here have painted (or even shown any interest in) miniatures-based board games for nearly twenty years or more, so having a pre-painted team seemed like a good idea. Until they arrived....

The paint job on each miniature is ok-ish.
The basic colours are in the right places, and sometimes even the details are quite nicely done. But the colours seemed a bit "muddy" and not all the finer details were picked out in quite the way we'd have liked, so we've all decided to buy each other a set of Citadel paints (or similar acrylic-based colours) for Xmas and have a "getting-re-aquainted-with-painting-miniatures-again" session in the New Year.


Which means stripping all the miniatures we have and starting again.
We tried the usual tricks of Dettol, Fairy power spray and a whole heap of other detergents (there's no excuse in not keeping the place clean and tidy any more) but each was quite fiddly and required lots of soaking, scrubbing, re-soaking and so on. So we put on some rubber gloves and dropped the miniatures into some industrial strength paint and varnish remover. This is a white jelly-like substance, but the miniatures are ready for scrubbing after just 30 minutes soak.


The stripper causes the acrylic paint (and top coat varnish) to become a slimy coating over the entire model:


A quick scrub with a toothbrush and most of the paint comes off in just a minute or two under a running tap. Not all of the paint came off in one go, with some of the paint proving quite stubborn in the deepest of recesses. However, this does help show up some of the finer details of the model, which may have got lost under the previous paint job.


After each model is stripped, we leave to soak in a bottle of clean water, to remove any nasty chemical residue left by the paint stripper, then dab dry with a towel and leave to dry out for a few hours in front of the fire.

We're going to take reference photos of all our stripped models, so that we can see where the finer details are after we've splodged paint all over them - it's very easy to miss the little bits and bobs, but it's these tiny examples of attention to detail that make the miniatures so impressive in the first instance - it'd be a shame not to show off the exquisite modelling to its best, which means painting and highlighting these parts that could otherwise go un-noticed.


Wednesday, 14 December 2011

Serial character LCD driver with Flash eeprom

No sooner had we got our serial character LCD display working than we were moving on to the next stage of the project - reading text from an Atmel AT45DB041D Flash eeprom chip to decide what to display on the screen.

We're already familiar with these chips, from our multiple servo controller board from back in May.
The idea is to store strings of text in these chips, then simply set a pointer (to tell the PIC where to start reading from) and get the microcontroller to read the text back and display it on the LCD.

We did look at I2C and other serial eeprom alternatives (at £1.20 each these Atmel chips are quite expensive for eeprom and at 4Mbit, are much bigger than we're ever going to need!) but most other (non-Flash) chips run at 100kz, or 400khz at best (yes, that's kilohertz, not Mhz). This will obviously make drawing text on the LCD run really slowly which is something we're keen to avoid.


These little Atmels can work up to 20Mhz. Which by happy coincidence is how fast the master chip will be running anyway, so hopefully we won't lose too much time reading and displaying text to the screen.


We wired our Flash eeprom chip up to PORTD on an 18F4550 (using RD.0-RD.3) and hacked some code together to read and write data to/from the chip. Amazingly, it worked first time!


AllDigital
Config PORTC = Output
Config PORTD = Output
Config PORTD.2 = Input

configuration:
       Symbol enablepin = PORTC.0
       Symbol clockpin = PORTC.1
       Symbol datapin = PORTC.2
     
declarations:
       Dim tmp As Byte
       Dim i As Byte
       Dim lcdi As Byte
       Dim lcdbyte As Byte
       Dim lcdbytetosend As Byte
       Dim rs As Bit
       Dim flag As Byte
       Dim mask As Byte
       Dim pageaddr As Word
       Dim byteaddr As Byte
       Dim byteswritten As Word
       Dim bytesread As Word
       Dim streamwrite As Bit
       Dim streamread As Bit
     
init:
       WaitMs 200
     
       Define SPI_CS_REG = PORTD
       Define SPI_CS_BIT = 0
       Define SPI_SCK_REG = PORTD
       Define SPI_SCK_BIT = 1
       Define SPI_SDI_REG = PORTD
       Define SPI_SDI_BIT = 2
       Define SPI_SDO_REG = PORTD
       Define SPI_SDO_BIT = 3
       SPIPrepare

       Gosub initialiselcd
       Gosub initialiseeeprom
     
       pageaddr = 1
       byteaddr = 0
       Gosub readanddisplaydata
            
loop:
     
       pageaddr = 1
       Gosub readanddisplaydata
       WaitMs 4000
       lcdbytetosend = 0x01 'clear screen
       Gosub writelcdcommand
     
       byteaddr = byteaddr + 16
       If byteaddr > 60 Then byteaddr = 0
     
       WaitMs 1000

Goto loop
End

writelcdnibble:
       Low enablepin
       Low clockpin
       If rs = 1 Then High datapin Else Low datapin

       Gosub toggleclockpin
     
       'shift in 4 bits
       mask = 8
       For lcdi = 1 To 4
              flag = lcdbyte And mask
              If flag = 0 Then Low datapin Else High datapin
              Gosub toggleclockpin
              mask = ShiftRight(mask, 1)
       Next lcdi
            
       'now strobe the clock one more time because ST+SC are tied
       Gosub toggleclockpin

       'toggle the enable pin to "flush" the data into the lcd
       Low datapin
       High enablepin
       Low enablepin
     
Return

toggleclockpin:
       'toggle the clock pin
       High clockpin
       Low clockpin
Return

writelcddata:
       rs = 1
       Gosub senddatatolcd
Return

writelcdcommand:
       rs = 0
       Gosub senddatatolcd
Return

senddatatolcd:
       lcdbyte = ShiftRight(lcdbytetosend, 4)
       Gosub writelcdnibble
       lcdbyte = lcdbytetosend And 15
       Gosub writelcdnibble
Return
     
initialiselcd:
       For i = 1 To 3
              WaitMs 50
              lcdbytetosend = 0x20
              Gosub writelcdcommand
       Next i
     
       WaitMs 50
       lcdbytetosend = 0x28 '4 bits, 2 lines, 5x7 font
       Gosub writelcdcommand
     
       WaitMs 50
       lcdbytetosend = 0x0c 'display on, no cursors
       Gosub writelcdcommand
     
       WaitMs 50
       lcdbytetosend = 0x06 'entry mode auto-increment
       Gosub writelcdcommand
     
       WaitMs 50
       lcdbytetosend = 0x01 'clear screen
       Gosub writelcdcommand
     
       'send a space character to the display to test
       WaitMs 50
       lcdbytetosend = 32
       Gosub writelcddata

Return

initialiseeeprom:
       Gosub set256pagesize
       Gosub chiperase
     
       pageaddr = 1
       byteaddr = 0
       WaitMs 100
     
       Gosub startstreamwrite
       For i = 0 To 63
              tmp = LookUp("Blood Bowl Griff Oberwald Varag Ghoulchew The Mighty Zug "), i
              SPISend tmp
       Next i
       Gosub endstreamwrite
     
Return

startstreamread:
       streamread = 1
       SPICSOn
       SPISend 0xe8 'stream read (legacy mode)
       SPISend pageaddr.HB
       SPISend pageaddr.LB
       SPISend byteaddr
       SPISend 0x00 'four don't care bytes
       SPISend 0x00
       SPISend 0x00
       SPISend 0x00
       bytesread = 0
Return

endstreamread:
       SPICSOff
       streamread = 0
Return

startstreamwrite:
       SPICSOff
       SPICSOn
       SPISend 0x82 '0x82 'write THROUGH buffer1 command
       SPISend pageaddr.HB '5 don't care bits + 11 address bits
       SPISend pageaddr.LB 'is the same as sending page address as hb/lb
       SPISend byteaddr 'last eight bits are buffer start byte
       byteswritten = 0
       streamwrite = 1
       WaitMs 5
Return

endstreamwrite:
       SPICSOff 'this causes the flash buffer to automatically get written to memory
       WaitMs 5
       streamwrite = 0
Return

set256pagesize:
       SPICSOn
       SPISend 0x3d
       SPISend 0x2a
       SPISend 0x80
       SPISend 0xa6
       SPICSOff
Return

chiperase:
       SPICSOn
       SPISend 0xc7
       SPISend 0x94
       SPISend 0x80
       SPISend 0x9a
       SPICSOff
       WaitMs 100
Return

readanddisplaydata:
       lcdbytetosend = 0x01 'clear screen
       Gosub writelcdcommand

       Gosub startstreamread
       For i = 1 To 16
              SPIReceive lcdbytetosend
              'for testing
              tmp = byteaddr + i
              Write tmp, lcdbytetosend
              Gosub writelcddata
       Next i
       Gosub endstreamread
Return


Note that in the initialiseeeprom routine we actually blank the Flash chip and write some data to it. In the final version of this code, we'll transfer data to Flash eeprom via a USB connection, but read it back just the same. Although this is just a basic test, it proves the idea of us storing character/player information in eeprom and calling it up and displaying it on a character-based LCD. All with just a few extra wires from the master microcontroller.

 [photo or video goes here]

Note that in this example we're using a rather tiny 2x16 character LCD (because we had some hanging around). We've got our fingers crossed that Santa will bring some larger 4x20 displays, like the one below which uses the same Hitachi 44780 controller chip, so the code should work for both.


With four lines of twenty characters, we can split player names over two lines (to allow really long forenames/surnames) and write player stats (MA, ST, AG, AV) on a single line - each stat (0-9) would take up four characters (XX-digit-space) so the output could look something like


 GRIFF
 OBERWALD

 MA4 ST5 AG8 AV9


Or, if we can get the player's name on a single line, something like:

 GRIFF OBERWALD

 MA   ST   AG   AV  
  4    5    8    9  


Serial-to-parallel LCD display driver

Amazingly we managed to get a working serial character LCD in under an hour today!
Just followed the schematics at http://embedded-lab.com/blog/?p=30 and converted the code example they gave into Oshonsoft Basic. Fired it up and there we go - a blinking "Hello World!" message using just three pins on the microcontroller.


The only real issue we had was that the contrast isn't brilliant; instead of a 10K linear pot, we've gone and used the first potentiometer that was to hand (a 1M logarithmic pot!)


If, like us here at Nerd Towers,  you're an Oshonsoft fan, here's the code listing to get everything working:

AllDigital
Config PORTC = Output

configuration:
       Symbol enablepin = PORTC.0
       Symbol clockpin = PORTC.1
       Symbol datapin = PORTC.2
     
declarations:
       Dim i As Byte
       Dim lcdi As Byte
       Dim lcdbyte As Byte
       Dim lcdbytetosend As Byte
       Dim rs As Bit
       Dim flag As Byte
       Dim mask As Byte
     
init:
       Gosub initialiselcd
     
loop:
       lcdbytetosend = 32
       Gosub writelcddata
       lcdbytetosend = "H"
       Gosub writelcddata
       lcdbytetosend = "e"
       Gosub writelcddata
       lcdbytetosend = "l"
       Gosub writelcddata
       lcdbytetosend = "l"
       Gosub writelcddata
       lcdbytetosend = "o"
       Gosub writelcddata
       lcdbytetosend = 32
       Gosub writelcddata
       lcdbytetosend = "W"
       Gosub writelcddata
       lcdbytetosend = "o"
       Gosub writelcddata
       lcdbytetosend = "r"
       Gosub writelcddata
       lcdbytetosend = "l"
       Gosub writelcddata
       lcdbytetosend = "d"
       Gosub writelcddata
       lcdbytetosend = "!"
       Gosub writelcddata
     
       WaitMs 4000
       lcdbytetosend = 0x01 'clear screen
       Gosub writelcdcommand
     
       WaitMs 2000

Goto loop
End


writelcdnibble:
       Low enablepin
       Low clockpin
       If rs = 1 Then High datapin Else Low datapin

       Gosub toggleclockpin
     
       'shift in 4 bits
       mask = 8
       For lcdi = 1 To 4
              flag = lcdbyte And mask
              If flag = 0 Then Low datapin Else High datapin
              Gosub toggleclockpin
              mask = ShiftRight(mask, 1)
       Next lcdi
            
       'now strobe the clock one more time because ST+SC are tied
       Gosub toggleclockpin

       'toggle the enable pin to "flush" the data into the lcd
       Low datapin
       High enablepin
       Low enablepin
     
Return


toggleclockpin:
       'toggle the clock pin
       High clockpin
       Low clockpin
Return


writelcddata:
       rs = 1
       Gosub senddata
Return


writelcdcommand:
       rs = 0
       Gosub senddata
Return


senddata:
       lcdbyte = ShiftRight(lcdbytetosend, 4)
       Gosub writelcdnibble
       lcdbyte = lcdbytetosend And 15
       Gosub writelcdnibble
Return


initialiselcd:
       For i = 1 To 3
              WaitMs 50
              lcdbytetosend = 0x20
              Gosub writelcdcommand
       Next i
     
       WaitMs 50
       lcdbytetosend = 0x28 '4 bits, 2 lines, 5x7 font
       Gosub writelcdcommand
     
       WaitMs 50
       lcdbytetosend = 0x0c 'display on, no cursors
       Gosub writelcdcommand
     
       WaitMs 50
       lcdbytetosend = 0x06 'entry mode auto-increment
       Gosub writelcdcommand
     
       WaitMs 50
       lcdbytetosend = 0x01 'clear screen
       Gosub writelcdcommand
     
Return

Back from Berlin

We've not really spoken much about our few days away in Berlin. Neither online, nor between ourselves. Which is a shame because we were really excited about going there and visiting a few of the different hackspaces. The problem was that the Kreuzberg region of Berlin where we were staying was pretty rough. And the so-called "hostel" we'd be invited to was little more than a doss-house squat.

After just a few days of living in squalor we changed our flights and came home. We never got to see any of the different 'spaces we'd planned on visiting scattered around the city (we'd arranged to visit the betahaus the morning after we'd arrived, which is also in Kreuzberg but got lost trying to find it!)


Graffitti is everywhere in Berlin - and especially so in Kruezberg. There are very few pictures or pieces of artwork (as shown in this photo) mostly it's mindless scrawlings, tags drawn in marker pen, and political slogans written in English.


There's a difference between "post-punk-industrial-style" and just filthy squalor. Coupled with a three-day "festival" during which thumping drum-n-bass played from midnight 'til around 10am (meaning no-one slept for the duration of the trip) we'd had enough after just a few days! Needless to say, it'll be some time before we endure another EasyJet flight to Germany's capital city!