It's a sad fact that some SD cards work differently to others.
Although there's a set of "standards" that all (most?) SD cards are supposed to adhere to, the degree of variance between cards is huge.
And we've just wasted about a month trying to fix a problem "properly" instead of doing the pragmatic thing and just hacking a solution together.
A while ago we started adapting some noise-playing alarm clocks. We completely replaced the onboard sound chip with one of our own design, which plays uncompressed wavs from an SD card. It took a lot of working out to get the SD card actually readable and when we thought we'd cracked it, put the audio player board back inside the alarm clock and gave it a try.
Incredibly, it worked first time!
And second time.
And third. But not the fourth.
In fact, after just a few plays, the SD card refused to initialise properly.
It all came down to the supply voltage. At 5v, we put the supply through a voltage regulator to give a steady 3.3v out. Everything worked fine. We put the boards into the alarm clocks and ran them off the 3v that 2xAA batteries created. In truth this was sometimes as high as 3.2v.
After just a few plays, the tiny voltage drop in the batteries was enough to stop the SD card from working.
But that's not where the story ends. Because we've spent about a month trying to use different triggering mechanisms, DC-to-DC converters, opto-isolators, PNP transistors and more yet all the time we had a working prototype on the desk. The circuit was exactly the same, we kept going back to the same (rough-and-ready) firmware. But all the time the prototype worked while every new version didn't.
And then we spotted the difference.
The prototype was using a genuine SanDisk micro sd card. The newer boards were using another brand. And that was enough to make a difference! SanDisk cards are pretty robust and can handle a wide range of supply voltages - cheaper, inferior brands can't.
So after a month of trying to build a circuit which is 100% compatible with all brands of SD cards, we've finally given up. And decided to only support a small sub-set of available cards on the market. It's not ideal. But it'll let us get these bloody clocks made up and shipped, hopefully this time of Christmas!!
Showing posts with label clocks. Show all posts
Tuesday, 18 December 2012
Wednesday, 21 December 2011
Christmas clocks
It's beginning to look a lot like Christmas...... everywhere you go. Ok, it's not. I don't know what it is this year - the doom and gloom peddled on all the news channels, the recession, austerity measures or what - but it just doesn't feel Christmassy.
Maybe it's just because the weather is still quite mild and all the spring bulbs are popping up.
But there's something particularly un-Christmassy this year. There are a few lights about and a few shops have made a half-hearted nod towards Xmas, but in the main - and talking to other people, I'm not the only one - we're still waiting to be hit full in the face with Christmas Cheer.
Which is probably why I've left it so late to get making Xmas gifts this year. Normally, come December 1st, the first little door on the advent calendar gets opened and it's straight into maker-mode, planning and making for everyone. But for some reason, this year things have been left a little late.
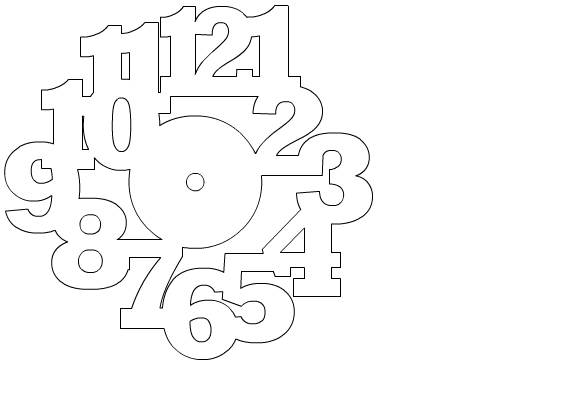
Back in November, I was helping Jason with his toy cars and lights controller. But since then, not much on the Xmas front. So last night I fired up the laser cutter and got designing some novelty clocks.
Most of the time was spent on the designing and drawing rather than the actual manufacture (which meant sending to the cutter, waiting a while, then some basic assembly afterwards) but the end results are quite pleasing:
[photo here]
Here are the design files should anyone fancy having a go -
Send the dxf to your laser cutter and carve out from your favourite coloured sheet of A4 acrylic (loaded in landscape).
Links to files:
To finish the clock off (and mostly, to hide the clock movement from behind) I cut out some shapes from a second colour and fitted them inside some of the cut-outs from the main clock face. By turning the clock over they could simply be held in place with some tape. I used double-sided tape, then stuck a piece of card over the whole arrangement, to keep the shapes from falling out once the clock was on the wall.
[photo of reverse]
Here's a slightly different clock, requiring a little more assembly.
At first I wasn't too sure about the design but the more I look at it, the more it grows on me. At first I thought about making the smaller coloured numbers as inserts (so they mounted flush with the surrounding shapes) but now I think I prefer them as relief shapes, sitting on top of the basic number shape.
[photo of second clock]
I think it's the clear acrylic ring that makes this clock work so well. It means positioning the numbers is relatively easy (it would have been a nightmare trying to stick just the very edges of a few numbers to the centre disc to hold it all together) but when the clock is on the wall, the final effect is quite striking!
Here are the design files if you fancy making one of these yourself:
Lastly, here's a simpler version of the second clock that requires much less assembly, designed smaller to fit on a single A4 sheet of acrylic (or wood or whatever you're making your clocks out of!)
Links to files:
http://www.nerdclub.co.uk/files/clock1_single_piece.dxf
http://www.nerdclub.co.uk/files/clock1_with_insets.dxf
http://www.nerdclub.co.uk/files/clock1_inset_numbers.dxf
Maybe it's just because the weather is still quite mild and all the spring bulbs are popping up.
But there's something particularly un-Christmassy this year. There are a few lights about and a few shops have made a half-hearted nod towards Xmas, but in the main - and talking to other people, I'm not the only one - we're still waiting to be hit full in the face with Christmas Cheer.
Which is probably why I've left it so late to get making Xmas gifts this year. Normally, come December 1st, the first little door on the advent calendar gets opened and it's straight into maker-mode, planning and making for everyone. But for some reason, this year things have been left a little late.
Back in November, I was helping Jason with his toy cars and lights controller. But since then, not much on the Xmas front. So last night I fired up the laser cutter and got designing some novelty clocks.
Most of the time was spent on the designing and drawing rather than the actual manufacture (which meant sending to the cutter, waiting a while, then some basic assembly afterwards) but the end results are quite pleasing:
[photo here]
Here are the design files should anyone fancy having a go -
Send the dxf to your laser cutter and carve out from your favourite coloured sheet of A4 acrylic (loaded in landscape).
Links to files:
- http://www.nerdclub.co.uk/files/numbers_clock1.dxf
- http://www.nerdclub.co.uk/files/numbers_clock1b.dxf
To finish the clock off (and mostly, to hide the clock movement from behind) I cut out some shapes from a second colour and fitted them inside some of the cut-outs from the main clock face. By turning the clock over they could simply be held in place with some tape. I used double-sided tape, then stuck a piece of card over the whole arrangement, to keep the shapes from falling out once the clock was on the wall.
[photo of reverse]
Here's a slightly different clock, requiring a little more assembly.
At first I wasn't too sure about the design but the more I look at it, the more it grows on me. At first I thought about making the smaller coloured numbers as inserts (so they mounted flush with the surrounding shapes) but now I think I prefer them as relief shapes, sitting on top of the basic number shape.
[photo of second clock]
I think it's the clear acrylic ring that makes this clock work so well. It means positioning the numbers is relatively easy (it would have been a nightmare trying to stick just the very edges of a few numbers to the centre disc to hold it all together) but when the clock is on the wall, the final effect is quite striking!
Here are the design files if you fancy making one of these yourself:
this is the clear acrylic ring that some of the numbers mount onto
with some clever layout, you can get all the numbers onto a single A4 sheet
optional extra - inset characters for the numbers 2,4, 6, 8, 10 and 12
Links to files:
- http://www.nerdclub.co.uk/files/numbers_clock2_circle.dxf
- http://www.nerdclub.co.uk/files/numbers_clock2_clear_ring.dxf
- http://www.nerdclub.co.uk/files/numbers_clock2_insets.dxf
- http://www.nerdclub.co.uk/files/numbers_clock2_numbers.dxf
this clock has all the numbers connected to make a single solid piece
using the previous clock as a base, this clock can also have raised numbers placed on top of the base design, or you can cut the inset figures out and use different coloured acrylic (wood, whatever) to fill the gaps
Links to files:
http://www.nerdclub.co.uk/files/clock1_single_piece.dxf
http://www.nerdclub.co.uk/files/clock1_with_insets.dxf
http://www.nerdclub.co.uk/files/clock1_inset_numbers.dxf
Subscribe to:
Posts (Atom)