Wednesday 30 November 2016

Changing textures at runtime in Unity

One of the things we're keen to get working for our Unity game is the ability to customise Fantasy Football characters. As different characters have different amounts of armour, we're modelling the characters with every possible armour piece attached, and then disable them at runtime in Unity.

To be able to do that would be pretty cool.
What would be super-cool would be to have the player design their own team strip (perhaps using some kind of web editor) and then have their players clad in their own custom colours.

To do that would require generating and changing textures on-the-fly. Now we're pretty sure - with some PHP and GDI+ - we can generate the appropriate png at runtime. What we need is a routine to allow us to change the texture of an object at runtime in Unity.

Luckily, it's not that difficult:

using System.Collections;
using System.Collections.Generic;
using UnityEngine;

public class loadTexture : MonoBehaviour {

   public GameObject target;
   public string web;

   // Use this for initialization
   void Start () {
      if (web.Length > 0) {
         StartCoroutine (loadImage (target, web));
      }
   }

   private IEnumerator loadImage( GameObject page, string url ) {
      WWW www = new WWW( url );
      yield return www;
      page.GetComponent<Renderer>().material.mainTexture = www.texture;
   }


}

We set the script up by dragging the orc skin into the "target" field, and setting the URL to our (local) web server.


When the game engine runs, our orc appears with the default green skin:


But when the next texture has finished downloading, the skin colour changes immediately.


It's only a little thing, but it's pretty exciting for our game idea; we've potentially got the ability to allow players to create (and download) their own team colours - and in Unity it simply means loading a new (single) texture/png from the web server.

When playing against an opponent, the Unity app could download their team colours, thus allowing both players to completely customise their own teams - and have their team colours appear in other people's games.

The original (or, more accurately, the second edition) Blood Bowl boardgame came with a number of "endzone" markers, for different teams. The game was very much about customising the teams - creating your own team name, mascot, insignia, team colours etc. In the game, the endzones at the end of the playing surface were simple double-sided strips of card which could be swapped out depending on which team(s) were playing.


Not only could we provide players with the ability to create their own team colours, we could even have custom in-game end-zones by simply swapping out a texture or two.

Now that would be pretty cool.....


Tuesday 29 November 2016

Blender and weight painting

So far we've managed to import an existing Unity Asset into Blender, create our own mesh, unwrap UVs, use existing UVs and add a custom rig.

In truth, the rigs that come with Unity Assets are almost impossible to use for animating in Blender - quite often the bones are disconnected and each faces upwards/outwards.


After doing some research into motion capture software (particularly using the Microsoft Kinect, but more on that later) we worked out why this might be - but it doesn't help us, when we want to create our own, custom animations from within Blender. We need to throw this set of bones away and use our own rig to animate the mesh.

And to do so isn't exactly trivial. It's not especially difficult either - at least, not to get a mesh moving to a skeleton. But it is tricky to get it working as well as the original Unity Asset. This is mostly because - it turns out - of weight-painting.

So far, whenever we've parented a mesh to a rig, we've used the with automatic weights option. Which makes it work. But not without problems. The most obvious example of this is around the hips; check out this walk animation.


Watch the bit at around 17 seconds in, where the character walks towards the camera. Notice the "trouser line" where the waist meets the hips. That moves around quite a bit. Which is fine for an organic shape (a humanoid shape covered in fur, for example) but if this character was indeed wearing a belt, things would look a little bit funky.

And that's because the hips - in this model - are weighted above the belt-line. Compare that to one of our imported models.


In order to display the weights on each bone, there are a couple of things to do first - obviously we need to be in weight-paint mode. But in this mode, there's no easy way to select a bone on the model - luckily we can use "vertex groups" to select the points on the model that are effected by each bone.

If we move the hip bone on the model above, there's a very definite "line" where the deformation stops acting - just below the "belt-line".


When we inspected the weights on our imported models, we noticed that where the effects of different bones start and end, the weight painting is the same for both bones.


Note how the lower leg bone affects the shin area mostly, and the knee area is green (affected quite a bit, but not any further up the leg). The upper leg bone affects the thigh area and the knee area is also green. The affect of the upper bone goes no further down the leg than the knee. This ensures that there is no "overlap" between the  two bones, so they do not "compete" for influence over the mesh.

Which means our next Blender project will be to rig a model, apply some custom UVs, and weight our custom rig to create a similar behaviour. Right now it's getting a bit late, so that will have to wait for a few days....

Sunday 27 November 2016

Blender FBX import - where are the UVs?

In the last couple of years, we've racked up quite a bill on the Unity Asset Store. A good few hundred quid a last. Some of this has been for plug-ins or shaders, but the bulk of it has been for models.

Quite often the characters come with animations, which is great. But if they need altering slightly, or a new animation is required, or the model needs a bit adding/removing, things get a bit trickier.

Most often, Asset store characters are supplied with the models, in FBX format. And Blender likes FBX. But when you import the model into Blender, quite often, you don't quite get what you'd expect...


Here we imported one of the soldiers from the Toon Soliders pack (an amazing character set, btw, with some really nice animations thrown in, as well as a mecanim-ready rigged character). But even after setting the view to textured the model appears as a solid, blank canvas.

If we go into our UV editor....


... there's nothing there!


Even if we select the model, and the material that came with the FBX....


... nothing doing.  We tried to load the texture into the explorer panel on the right, but the model stubbornly refused to render with the material/texture we've set.


The way to do it, is to select the model, enter edit mode, select all faces (not edges or vertices)...


Then select UV view from the bottom-left option in the menubar.


Bingo! We've now got the UV shapes - but there's still no sign of the texture. To fix this, in UV view, load the appropriate texture/png from disk.


If you've selected the right texture, everything should line up just right. Go back to 3D view and, hey presto!


Now our imported character looks just like he should, when used in Unity. To prove this, save the entire .blend file into your Assets folder and flip over to Unity. Drag-n-drop the character into the scene (Unity automagically imports .blend files using the built-in FBX importer, so no need to export again) and apply an animation.


Choose the most appropriate shader for the model, by selecting the character in the explorer, expanding the list and selecting the mesh:


Hit play, and watch your (Blender modified) character come to life!


Friday 25 November 2016

New press-n-peel printer

After a mis-hap with our Dell laser and some acetate (seriously, Steve, what did you think would happen, putting thin plastic through a thermo-nuclear-hot fuser?) it was time to get a replacement.

Just over a year ago we tested a few different printers for use with both genuine press-n-peel blue (which currently costs a staggering £5/sheet) and the cheap yellow chinese alternative we bought (10p per sheet)

Surprisingly, we were able to go into a shop - a real, physical shop made out of bricks and everything - and pick up a desktop Xerox Phaser for around £120.


(Another) Steve at Kings Printers in Brighton was incredibly knowledgeable about printers, feeder ports, toner components and so on. He also did a lot of research on our behalf, contacting toner manufacturers (and a fair few "compatible" providers) before returning the same conclusion we'd already come to: for press-n-peel, Xerox is best.

And after a quick test with our cheap alternative paper:


Good, strong, solid black. No scaling or broken traces. Although we forgot to photograph the final board (it was etched, lacquered and put into a final product before we thought to photograph it) you can see the quality of the Xerox print for press-n-peel use.

In short, if you're struggling with press-n-peel (a lot of people do, and we regularly get questions about how to get the best results from non-optimum papers) you could do a lot worse than upgrade your laser printer.

A genuine desktop Xerox is much less expensive than we were expecting - and the results speak for themselves!


Thursday 24 November 2016

Importing BVH files into Blender Rigify-ied rig with MakeWalk

Did anyone mention that animating is really, really hard? Rigging a character in Blender is pretty straight-forward, even if you do it yourself. With just a few mouse clicks, you can easily Rigify a character, and have full IK/FK support. Moving limbs and waving arms around is pretty simple stuff.

But creating a realistic animation - making the character look like a real, living, breathing thing, rather than a stiff, robotic puppet - is really hard. Plus, for some poses, FK (forward kinematics) is ideal. But for some poses, IK is preferable. And getting Blender to play nicely, as you switch from one to the other, is a bit of a nightmare.

Luckily, there's a (relatively) easy solution: BVH.
And ever since the first Microsoft Kinect (originally for XBox) hit the market, indie game developers have had access to a nice, easy, cheap(ish) motion capture device.


The Kinect For Windows package is now discontinued, but you can still use a Kinect One for XBox and a PC connection cable to get the same result.

The cable costs more than the Kinect (though both can be bought online for around £40 if you look carefully). So, of course, we snagged a few and looked at how we can use them for our animations.

While we're waiting for them to arrive, we took a look at BVH animation in Blender. There are quite a few software packages that work with the Kinect One to create BVH animations (we'll try a few out when the hardware actually arrives) - so in the meantime, we thought it best to look at how to use BVH files with our rigged character in Blender.

It turns out, it's actually quite easy to import BVH animations into Blender - simply download the MakeHuman Blender tools, and activate the MakeWalk plug-in in your Blender project.


Then load your character, complete with rig (either a hand-carved rig or a Rigify generated one) and when in pose mode the MakeWalk tab should appear in the Tools panel on the left of the screen (assuming a default pane layout in Blender)


Hit the "load and retarget" button and hey presto! Your character takes on the BVH animation.

If your character stubbornly remains in the t-pose position, use the play/frame advance tools to move through each frame of the animation. If there are no frames of animation in the timeline, check your console for import errors.

Now that was easy. But it's not the end of things. Most BVH files are massively wasteful. They key just about every bone, location and rotation on just about every frame. And there are also a couple of frames where "glitchy" poses appear.

Even for an energetic ballet dance move, something doesn't look quite right in this frame!

So there's a bit of tidying up to do. But, in general, it's a quick and easy way to get a basic animation into Blender. We usually just flick through the animation and where any one frame looks particularly out of place, simply remove that keyframe. As long as there is a decent keyframe before and after the offending frame (or frames, you can get away with deleting up to 5-10 consecutive frames before it's noticable) you should be ok. Looking at the dope sheet however, shows us a slightly different story:

Wow! That's a lot of keyframe information.

Probably about 90% of this keyframe information is unnecessary (that's just a guess - plucked a number completely out of thin air). But given that Blender (and, eventually, our target platform Unity) will automatically tween between two poses, what we really need to do is grab just the pertinent frames of action - keep the main key poses between actions, and let Blender fill in the gaps, rather than force our model into a set pose on every single frame.

With our animation, we found that the first 21 frames were basically the same pose - the actor in the BVH mo-cap studio obviously readying themselves to perform the action. So we kept frame one and frame 22 and deleted all the other frames between these two. The animation played more or less the same, but with only one key pose, instead of 22, at the start of the animation.

Here's the same dope sheet, but with only the important frames kept in - any frames where the character was simply transitioning from one pose into the next, we deleted.


While we're still keying every bone, location and rotation, between frames 1-50 we now have eight fully-keyed frames of animation, instead of fifty. Already that's a massive reduction in animation data.

The playback still looks pretty much the same as the original. A few, tiny, subtle little nuances may be lost. But that's the compromise for getting good, clean, small-sized animation data; something we're happy to live with.

The only issue with this approach is that it boring. Repetitive and boring.
Now animation isn't hard. Just tedious!

Wednesday 16 November 2016

Simple walk cycle in Blender

Following on from our Rigify rigging, we had a go at animation today. Let's be clear. Creating animations is not easy! But one of the simplest animations to do, with 3D software, is a simple walk cycle.

So we started off with our "extreme" pose. With auto-keying set, each time a bone or IK controller is moved, Blender automatically creates a key frame for you.


We used the IK controllers on the hands and feet to create a classic walking pose. For good measure, in pose mode, we selected all the bones in the rig and - via the Space popup menu - hit "insert keyframe". Then, with all the bones still selected, hit the copy pose button.

Then, forty frames on, we hit the "paste reversed" button. It's the second of the two paste buttons. A perfect mirror image of the pose appears.


Then, forty frames further on again, we paste the original pose (not mirrored). In the section at the bottom, we set the animation to run from frames 1-80 and hit play. Already we have a simple (albeit rather clumsy) walk animation.


Now, that's ok. But it's not brilliant. It's a bit "lifeless".
So we now need to create the "crossover pose". This is the pose, exactly half-way along the animation, where one leg crosses over the other. While we're about it, we made a few tweaks to the crossover pose.

It's at this point in a walk action, where the "front" leg  is taking the entire weight of the body. It's also where the character is getting ready to "spring" into the next pose. As such, the body needs to be compressed slightly - the front leg bent slightly, ready to push off with the next step. So we grab the hips and pull them down slightly.


Because our hands are still set to IK (inverse kinematics) they remain exactly in place, even though the entire body has shifted down a little (almost as if they were holding onto some invisible bars, keeping them at their current level). So we grab each hand and pull them down, towards the floor, a little bit.

Then, forty frames further on, we paste a mirrored copy of this cross-over pose. Already our walk cycle animation looks much better.


Now that's a bit more like it. It's not perfect, but with just two major poses (mirrored at the appropriate points in the animation) our walk cycle has a lot more life in it!
If you watch the animation back, the character appears to "ride on his heels" for a long part of the walk. We would prefer his foot to be flat to the floor for a longer time during the animation.

So between the extreme and the crossover poses, we created another keyframe, this time placing the foot flat on the floor (and turning the toes a little to flatten the foot out completely).


After watching the animation through a few times more, we found a slight - ever so slight (in fact, probably not even noticeable once the character is in a game world, animated, and viewed at a distance from a slightly overhead view-point) problem. As the foot slides back, from the crossover to the extreme pose, it can dip below the floor line.


Another key frame and a quick tweak, and the animation is pretty much done. For now, anyway. There's no real character to the walk - no gait, or anything to indicate whether this is a light or heavy person. But it's a start!


In hindsight, we'd probably make this animation run over 60 frames, not eighty. As it is, the character appears to be walking quite slowly. So we should either speed it up a little, or play about with the key-frames, making the rise take longer, and the "fall" into the crossover position quicker, to indicate a slow, heavy, lumbering character.

There are probably plenty of ways we can add a little more character to the animations. But for now, we're just getting used to mixing IK and FK controllers to create simple animations for our Unity game. Next up.... getting the animations to play in Unity!

Rigify for Blender with Unity

Recently we had a play about with rigging custom characters in Blender. We made some simple rigs and correctly mapped the bones to Unity's Mecanim system. This is great for rigging characters to enable them to pick up and use existing animations within Unity.

But what about animations that don't yet exist?
Blender itself can be used to create custom animations. But animating with such a simple rig can be a bit of a headache. Make a slight adjustment to just one bone and your entire character can be thrown out of whack.

To create realistic animations, we really need to be using IK (inverse kinematics) - not just FK (forward kinematics) as our simple rig provides. This is where the Blender plugin Rigify comes in really, really useful!

Starting with a blank (no bones) mesh, and with our editor in object mode, we use menu Add - Armature - Human Rig


There's a chance that the rig appears at the cursor position, ,rather than centred nicely, so set the rig (in object mode) to 0,0,0. At this stage, it doesn't matter if the rig isn't the same size as our mesh - we'll deal with that in a second.


It's debatable whether you should scale the rig, or scale the mesh to fit. We decided to leave the rig and scale the mesh to match it. It's almost there - just needs a little tweak.


We select the mesh and enter edit mode. Then select all the faces and scale the mesh up, ever so slightly. Doing things this way should make it easier for us to create similarly sized characters in future.

To save on work, we click the "x-axis mirror" option and now start to fit our rig to the mesh. While it's tempting to just grab bone nodes and move them around, we've found that rotating limbs into the arms and legs gives a nicer deform when animating the character in later stages.

So, in edit mode, we select the entire leg chain in the rig, click to place the 3d cursor at the hip joint of the leg, then use the rotate handle to position the leg bones as closely as possible to the leg mesh.


Then - just as we did with our simple rig - we move the bones "into" the mesh, grabbing and moving the ends of the bones so that the shoulder, elbow and knee joints are in the best places within the mesh. Don't forget you can rotate the view around and make sure the bones fit into the rig from the top, side and front!


With all the bones positioned, it's time to create our Rigify Rig. With the armature selected in the main window, and the armature tab selected in the treeview panel, scroll down to the Rigify Buttons entry and click the "generate" button.


After a few seconds, the Rigify Rig appears.
We're done with the "metarig" so you can hide it now...


The Rigify Rig contains loads of bones and controllers, spread across a number of different layers. While we've generated a skeleton, we haven't yet rigged it to the mesh. So we need to show the deformation bones in the Rigify Rig. Shift-Click the layer indicated, and the deformation bones should appear. If you can't see them, try turning on the x-ray option also.


Now in object mode select the mesh first, then shift-click the underlying bones/rig, then ctrl+P to parent the mesh to the rig.


We're almost done.
If everything has gone well, you should now have a controllable rig, mapped to the mesh. Select the rig and enter pose mode.

Grab one of the IK indicators around the feet or hands, and set the IK value from zero to fully one. Move the IK object around and watch your character's legs/arms move around in response to your positioning the hand/foot.


Using IK makes positioning your characters much, much easier than an entirely FK bone-chain. We're now off to have a play with the FK/IK settings in Blender and see what's involved with creating a simple walk cycle.....


Monday 14 November 2016

Creating a simple mecanim-ready rig for Unity with Blender

Since getting our two-screen PC setup working, we've been doing quite a bit of messing about with Blender. As well as modelling some cool armour add-ons for an existing Asset Store character, we've been playing about with rigs and bones and creating animations (spoiler alert - animating is hard).

There are plenty of tutorials and rigs for Blender all over the intertubes - many of them make rigging look like hard work. Some of them even tell you it is. But actually rigging a character for use with (pre-existing) mecanim animations isn't that onerous at all.

The trick is to make sure you're in the correct mode in Blender when creating and editing the bones and meshes. We threw together a quick rig in Blender, exported the model into Unity and had it picking up the mecanim animations in next to no time!

I guess we all have to start somewhere, so this is how  I did it. It might not be "right". It might differet to others do it. It might even be the same. But this is how I got it to work.
First things first, we need a mesh. This is a character I nicked from an existing Asset store (though modified and with some UVs mapped to it). With the mesh in position (at 0,0,0 and rotated to zero) we need to add some bones. Let's start with the first one.

In object mode, menu Add - Amature - Single Bone


And, like magic, a bone appears.


If the bone appears hidden, or inside the mesh, we need to make it visible from all angles, by ticking the "x-ray" box in the object tree. With the bone selected, go to the tree panel and select the object tab, Scroll down the list and tick the x-ray box. The bone should now be visible, no matter which angle you view your model from.


With the single bone selected, change from Object mode to Edit mode using the little menu at the bottom. Select the head of the bone and place it roughly where the neck will start. Place the tail of the bone below where the hips will end.


Now here's where one of the really nice things about Blender comes in. Instead of trying to learn and remember a million and one keyboard shortcuts (some of those online tutorials just give a stream of Ctrl+ this and Alt+Shift+that) you can simply hit the space bar.
A pop up menu lets you type in what you want. The search results are (usually) context sensitive. So with just a few keystrokes, you can usually find what you're looking for.

With the entire bone selected (but still in edit mode) hit space and type "sub"


We're going to split the back bone into three pieces. Mecanim likes bodies split into three. So we choose armature - subdivide (notice how the search results change if you have a different object selected, or are in a different mode)

And change the number of cuts to two (we want the backbone to be in three pieces, so need to cut it twice)


Now we need to create some legs. Before going any further, let's turn on "x-axis mirroring" so that as we build the armature on one side of the character, Blender does the same amount of work for us, on the other side.

In edit mode, with any bone selected, go to the "options" tab in the tools panel and select X-axis mirror. Now, any operations we perform on our rig will be repeated on the opposite side of the character.

Let's start with a leg. Select just the node between the hips (lowest bone) and the abdomen (middle bone). If either of the entire bones light up, you need to select just the connection point, not the entire bone. Hit the space bar and type "extrude". Select Armature - Extrude. You can see that there's also a keyboard shortcut to achieve the same - just press E to start an extrusion.


Move the mouse around and when the new bone is in the right place, simply left-click to create the new (extruded) bone. Now select the new bone entirely, and from the tree panel, select the "bone" tab. Scroll down and untick the "connected" tickbox.


Now we can move the new leg bone around without affecting the rest of the bones. A dotted line shows us where the bone originated (and its parent) but by disconnecting the bone, it doesn't have to start/end connected to a previous bone.


Now- what about that x-axis mirror? Where's that gone?
Well, for that to work, it requires our bones to be named using a specific convention. Basically if you move a bone that ends in .L or _L, then any bone with the same name but a .R or _R suffix are moved/scaled/rotated at the same time. So you can name the first bone, with the suffix _L then create a second bone (extruding from the abdomen as before) and rename it with the suffix _R.

Then, as you move/rotate one bone, you should see the other bone reacting. An alternative approach would be to use Shift+E to extrude the bone in the first place. Doing this actually creates two bones - one with a _L suffix and one with a _R suffix; so as you move/scale one, the other updates in realtime.


With two leg bones - each with the suffix _L or _R - we need to subdivide these, just as we did with the backbone. This time, we split each leg into just two parts, with a single cut.


Then with the root of the leg selected, Shift+E to extrude a new bone towards the toe (or use the space menu and type Extrude on each leg, renaming each new bone with the appropriate _L and _R suffixes). It may be easier to switch to ortho-left view (numberpad 3). Select the new bone and subdivide into two.


Next, with the tip of the top backbone selected, Shift+Extrude the arm bone(s).


And subdivide into four parts (three cuts). The first part of the bone-chain is the collarbone. The second is the top of the arm or bicep. The third bone is the lower arm or forearm. The fourth bone is the hand controller.

Our character has fists, not fully articulated hands. So we're not going to bother with hands, fingers and thumb bones - a single bone to rotate the entire fist will suffice for our animations. Move the connection points between the bones to the correct places for the shoulder, elbow and wrist joints.


Don't forget to rotate the charcter and make sure that the bones are fully inside the mesh - not just from the front view, but from the side and top views as well. Depending on the mesh, you might benefit from disconnecting the shoulder joint/upper arm bone from the collarbone(s).

Lastly, turn off x-axis mirror and extrude the top of the backbone into the head. Sub-divide to create two parts. Move the connection between the two new bones to create a neck bone and a larger head bone.


Don't forget to shift into side-view to move the bone end-points forwards and backwards, especially when positioning the neck and head bones.

While it may be prudent to re-name bones as we go, we tend to do all the bone renaming at the end, working systematically through the entire skeleton, renaming each bone in turn.


Our bone names are:

  • head, neck
  • collarbone.L
  • upperArm.L
  • lowerArm.L
  • hand.L
  • chest
  • abdomen
  • hips
  • upperLeg.L
  • lowerLeg.L
  • foot.L
  • toes.L


Mirrored bones are renamed, but using the .R suffix.
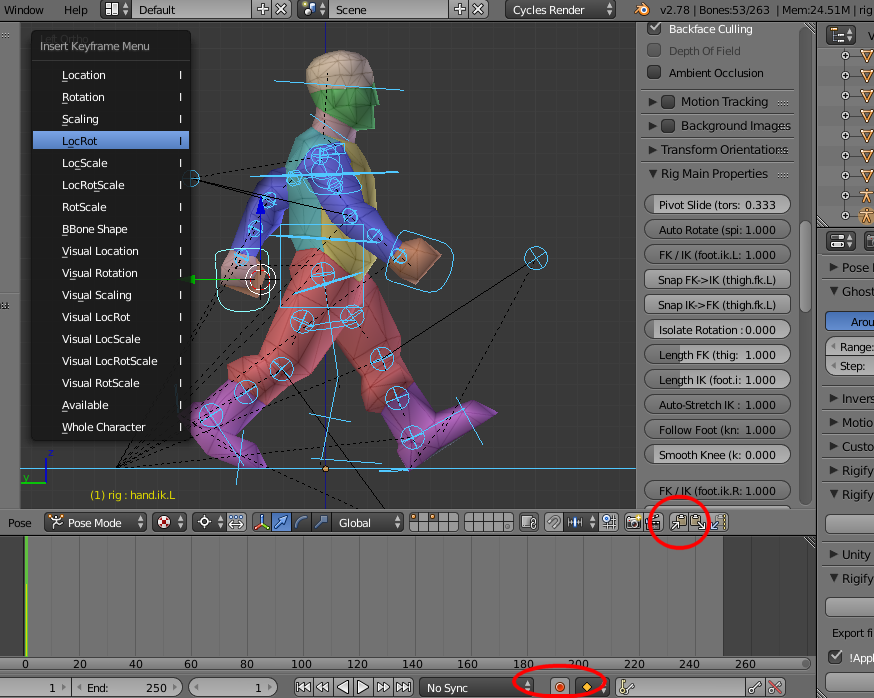
At this point, you can go into Pose mode and move the skeleton around.


But the mesh isn't rigged to the skeleton. To do this, we go into object mode and select our mesh first. Then shift-click to select the bones (the entire skeleton should highlight, indicating you're in object mode - if just a single bone lights up, you're probably still in edit or pose mode!)

On the keyboard, hit Ctrl+P and select Set Parent To - Armature Deform - With automatic weights. Now, as you move the bones around, the mesh should follow.


Save the file.
Copy it to your Unity project Assets folder.
Open Unity.

After starting up, Unity will automagically import your new Blender character. Select your Blender character from the project panel and in the Inspector window, click the "Rig" button. Set the type to humanoid and hit "configure".


After a few prompts to save and apply changes, you should see how well Unity has imported the new model. If all has gone well, the entire character should be green.


Hit the Muscles & Settings button to check that the character deformations are correctly applied when the bones are moved around.


If your character is correctly rigged (and it should be if you've followed the steps carefully) moving the sliders should animate the floating character properly. When done, scroll down the inspector panel and click the "done" button.

Now, drag an instance of your new character into the Unity world stage. Assign a mecanim controller and apply any mecanim-compatible animation. Hit play and watch your new character come to life!

Here's our character playing a full cycle of fighting animations, created by a third-party.


Ta-da!